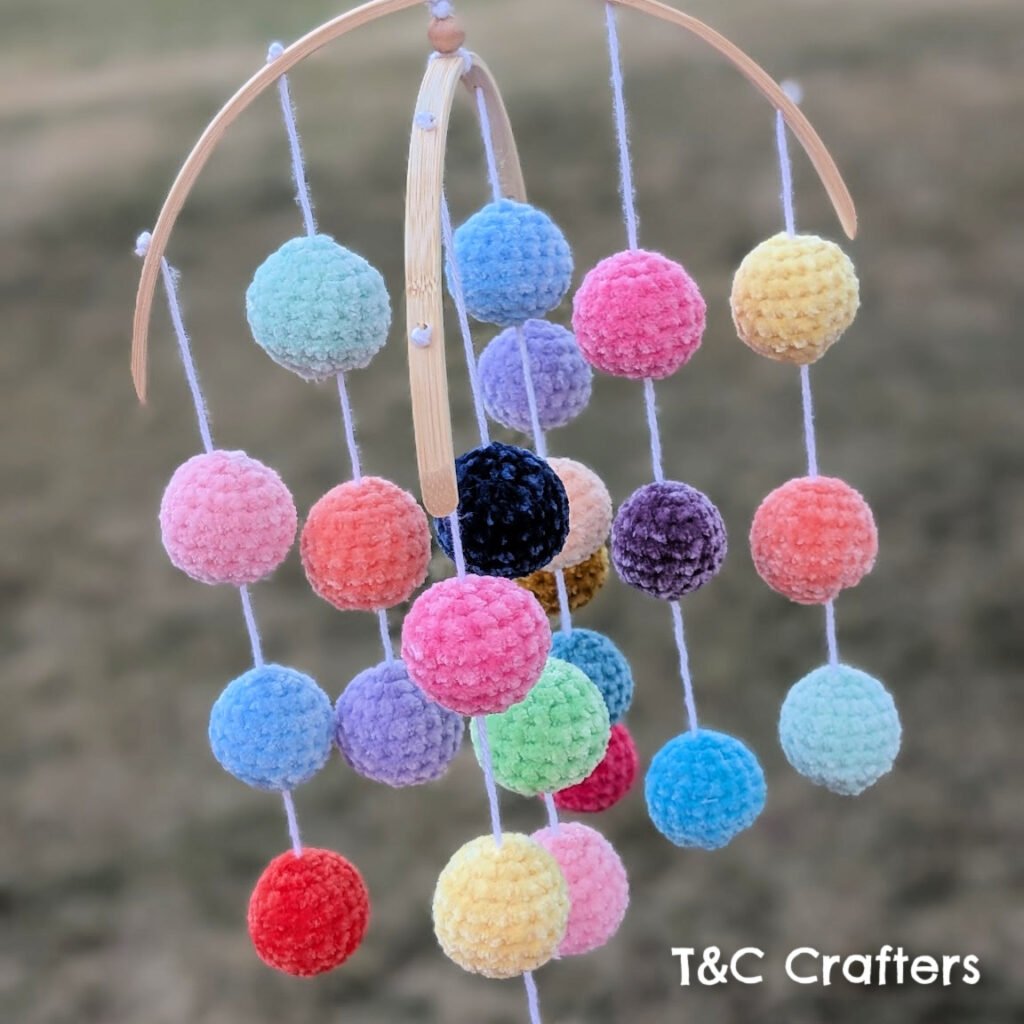
Polka Dots Baby Mobile – Free Crochet Pattern
The Polka Dots Baby Mobile is a free, beginner-friendly crochet pattern for a baby mobile made with crocheted plush balls. Within this post you can find the pattern and tips for making it.
Some of the links in this post are affiliate links for Wal-Mart, Amazon, and Etsy. If you go through them to make a purchase, I will earn a small commission at no cost to you. Thank you for your support!

My work bestie recently welcomed the most beautiful identical twin girls. She chose to decorate their nursery with pastel rainbow colors and super cute rainbow polka dot stickers. When she was considering what mobiles to choose for their cribs, she wanted to stick with the rainbow polka dot theme and found a cute crocheted version on Etsy by SaigonMade. She asked me if I could make her something similar to that but in her colors.
The original design was made with sport weight yarn in a cotton/poly-acrylic blend. I originally started out by trying this design with Lion Brand Mandala Bonus Bundle Yarn in the colorway Giant and a 3 mm hook. After working up a crocheted ball in the right size, I realized that this choice of yarn was definitely not going to work since one ball took me about 45 minutes, and I needed to make 48 balls total for the two mobiles.
My next step was to try using worsted weight acrylic yarn. I used a 4.5 mm crochet hook with Big Twist Value yarn to make a sample ball, and it worked up so much more quickly! However, while working up this option, I thought I would also try to see how the velvet yarn I had in my stash would look. I made both versions and sent her this picture to let her pick which one she liked better.

She absolutely loves the feeling of velvet, and we both liked the look of softer yarn for the crocheted balls, so she opted to go with velvet yarn rather than the worsted weight yarn. I think this was definitely the right choice! The finished pieces turned out so super cute!
To be honest, I feel a little silly calling this a pattern since it really is just crocheted balls made into a mobile. However, I felt that since they turned out so cute, someone else (like you!) may want to make a mobile just like this and that a tutorial could be helpful. I hope you enjoy reading about how I made these fun mobiles!

What Supplies Do You Need to Crochet a Polka Dots Baby Mobile?
- Mobile Hanging Frame (they come in a pack of two)
- Velvet Yarn in a Variety of Colors – I used Premier Just Chenille and Bernat Velvet yarn
- G6/4 mm Crochet Hook – I used my Clover Amour ergonomic hook
- Stuffing
- White Yarn for Hanging – I used worsted weight, but you may want to use a lighter weight.
- Small Wooden Beads
- Scissors
- Yarn Needle
Notes about Materials
As I mentioned earlier, the original inspiration for this mobile was made with sport weight yarn in a cotton/poly-acrylic blend. I chose to use velvet yarn instead because we liked the look of the velvet better and the balls worked up so much faster and easier. Because I used such a wide variety of colors for this mobile, I used a combination of different velvet yarns including Bernat Velvet, Bernat Baby Velvet, and Premier Just Chenille.
I have really tight tension when crocheting, so I chose to use a hook that’s a little on the larger size for this yarn. I used a G6/4 mm crochet hook, but you could certainly size down your hook with this type of yarn. You will definitely want to do that if you notice gaps between your stitches where stuffing could poke out.
Each ball requires a very small amount of stuffing, but because the mobile is made up of a total of 24 balls, you will need to have at least a small to medium-sized bag of stuffing.
What Size is the Finished Polka Dots Baby Mobile?
I made the hanger on the mobile 5 inches long. The mobile measures 12 inches long from the bottom of the arch to the end of the lowest ball. The finished mobile is 10 1/2 inches wide.
You can customize this mobile to be whatever size you need it to be by changing out the hanger or adjusting the lengths of the yarn for hanging.
Gauge (Not Essential)
Using a G6/4 mm crochet hook and velvet yarn, a magic circle with 6 single crochets should measure just under 7/8 inch in diameter.
Abbreviations (US Terms)
- CH – Chain
- SC – Single Crochet
- INC – Increase
- DEC – Decrease
- FO – Finish Off
Pattern Notes
This pattern is pretty simple – just make 24 of the small balls using the following pattern. The difficulty in this tutorial comes in actually assembling the finished mobile. See my assembly notes following the pattern to help you out!
You can make the balls whatever colors you would like to fit your color scheme. I made no more than two of the same color when making mine so that there was a lot of variety, but you could easily stick with three colors and make a ombre effect or even make all the balls the same color and go with a monochromatic theme.
Crochet Pattern for Each Ball – Make 24
Make a magic circle.
Round 1: CH 1. SC 6 in magic circle. Pull to close (6)
Round 2: INC 6 (12)
Round 3: [SC, INC] x 6 (18)
Rounds 4-8 (4 rounds): SC 18 (18)
Begin stuffing, but do not over stuff.
Round 9: [SC, DEC] x 6 (12)
Add a little more stuffing, being sure not to use too much.
Round 10: DEC 6 (6)
FO. Add a little extra stuffing if necessary or remove some if the ball seems too full.
You can sew the hole closed at this point or after you string the balls up. I chose to sew all mine closed after stringing them on the white yarn to hang. This allowed me to use knots in the white yarn I hung it on so that the balls wouldn’t change position or fall down as the mobile spins.
Assembling the Polka Dots Baby Mobile
I assembled the hanger before attaching the yarn balls to it. To assemble the hanger, I took a long strand of the white worsted weight yarn and folded it in half. To make the hanger at the top, I made a large loop where the yarn was folded and tied it tight. I then threaded on a small wooden bead for decoration.
I then used a small yarn needle to thread the yarn through the hole on the hanger coming from the top down through the bottom of the first piece. I split the two strands of yarn and wrapped them coming up from either side around the hanger a few times and then secured it with a double knot below the hanger.
I then repeated this process with the second piece of the hanger, using a small wooden bead as a spacer. After the second piece of the hanger, I made a secure knot and melted the ends of my yarn with a lighter so it wouldn’t unravel and come lose. I then moved on to attaching the strings of balls.
As I mentioned above, I left all of my individual balls unfinished so that I could more easily string them on.
To string them on, start with a string for hanging that is about 2 feet long. Make a double (or triple) knot at one end of the string. Then, using a yarn needle, thread the yarn in through the opening of the ball and out through the top of the ball. Pull the yarn tight so that the knot sits right under the top of the ball.
For the next ball, make another knot in the yarn a few inches above the top of the ball that has already been strung on. Repeat the same process of threading the yarn through the open end of the ball and pulling it out the top, making sure the knot sits right under the top of the ball. Do this step one more time for the third ball.
Once all three balls are strung on to your hanging string, finish off the bottom of each of the balls by sewing the hole shut and hiding the ends.
Using the smallest yarn needle you have, sew the top of the string of balls through the hole on the mobile hanger, making sure to go up through the bottom and out through the top. Make a double knot to secure it at the length you want. I opted to cut my excess yarn about 1 mm from the knot and then used a lighter to melt the end of the yarn so it wouldn’t fray or come loose. You could also use a longer piece of excess yarn instead.
Continue this process for all 8 strands of balls. You want to make the lengths of each similar, but they don’t have to be exact. Mine were all pretty close in length, but there was definitely some variation. The mobile still worked fine with the varying lengths.
I ask that you please do not copy, sell, republish, or redistribute this pattern. You may sell items produced using this pattern (in fact, I hope you do!), however, please do not use my photos for your product listing.
Looking for More Patterns?
Check out some of my other free patterns!
- Super Speedy Scrunchie – Free Crochet Pattern
- Frosty Fun Freeze Pop Sleeves – Free Crochet Pattern
- Criss-Cross Bucket Hat – Free Crochet Pattern
Thanks for reading!
I hope you love this pattern! Be sure to comment below or tag me on social media @tandc_crafters if you decide to make one for yourself!
Be sure to follow along as I add new free patterns and tutorials to help you make the best of crochet markets!