Belly Friend Giraffe – Free Crochet Pattern
Looking for a soft and silly giraffe stuffie to gift or sell at craft shows? The Belly Friend Giraffe is a free, advanced beginner/intermediate crochet pattern for a stuffed giraffe plush designed by Madeline Spence and shared by T&C Crafters.
Some of the links in this post are affiliate links for Wal-Mart, Amazon, and Etsy. If you go through them to make a purchase, I will earn a small commission at no cost to you. Thank you for your support!
In a hurry? Pin this for later when you have more time!

If you love making stuffed toys with some personality, this Belly Friend Giraffe crochet pattern is the perfect addition to your pattern collection! With its rounded belly, simple shaping, and customizable spots, this giraffe would make a great baby gift, birthday present, or craft show best seller.
This pattern was originally created by Madeline Spence of Madeline Mae Co. I have acquired the rights to share this pattern from her archived collection, and I am so excited to share it, and many more of her patterns, with you here on T&C Crafters.
Be sure to also check out some of her new designs in her Etsy Shop!
The Belly Friend Giraffe is one of my favorite crochet patterns! I even wrote a pattern review for this pattern over two years ago!
Pattern at a Glance:
- Skill Level: Advanced Beginner/Intermediate
- Yarn Weight: Worsted (Size 4)
- Hook Size: 4 mm
- Construction Type: Worked in the round with separate pieces sewn on
- Finished Size: Approximately 10-12 inches tall (varies by yarn)
- Great For: Baby gifts, toddler gifts, craft fairs, nursery decor
Why Should You Crochet a Belly Friend Giraffe?
The Belly Friend Giraffe creates a super adorable, cartoon-like giraffe stuffed toy that is perfect for kids and adults alike. Giraffes are a common favorite animal among individuals, so you are sure to please a large crowd by offering these in your inventory!
This pattern works up fairly easily without any complicated stitches or methods. It is a great pattern for an advanced beginner or intermediate crocheter, although experts will love it too! Because a lot of the pieces are made individually in this pattern, it works great for batch-making for inventory prep!
While giraffe stuffed toys may be fairly commonplace in stores, the Belly Friend Giraffe creates a heirloom piece that simply can’t be replicated in retail stores! This design will be treasured for years to come!
What Supplies Do You Need to Crochet a Belly Friend Giraffe?
Yarn: Any Worsted (4) Yarn – See some recommendations below
Hook: 4 mm Crochet Hook – I recommend using a Clover Amour or Knit Picks Dots hook!
Tools: Scissors, Yarn Needle, Stitch Markers
Notions: 16 mm Safety Eyes/Felt Eyes, Stuffing
Recommended Yarn
This pattern is made using worsted weight (4) yarn. Here are some great worsted weight yarns I recommend:
- Red Heart Super Saver – 100% Acrylic and super durable
- Big Twist Value – 100% Acrylic and softer than some other value yarns
- Lion Brand Pound of Love – 100% Acrylic that is soft and comes in a large ball
Alternative Yarn Options
You can use any yarn weight to make the Belly Friend Giraffe – the size of your finished giraffe will just change with any adjustments in the weight of the yarn. You will likely need to adjust your hook size to match as well.
The designer suggested using Premier Parfait Chunky yarn, which is a super bulky weight (6) yarn. For this yarn, you will need 2 skeins of Sunshine and a little bit of Chocolate. Ella Rae Cuddle is a similar super bulky weight (6) yarn that works great!
If you are looking for a thinner, plush yarn, Bernat Velvet or Bernat Baby Velvet yarn and Circulo Amigurumi Pelúcia are both bulky weight (5) yarns that work up well!
If you would like to make a larger Belly Friend Giraffe, Bernat Blanket Yarn is a nice, plush option that will really make a statement! Even though it is a super bulky weight (6) yarn, I find that it works up much larger than the Premier Parfait or Ella Rae Cuddle.
Tools
- 4 mm Crochet Hook – This is recommended if working with worsted weight yarn. If using a different yarn, adjust your hook size accordingly.
- Scissors
- Yarn Needle – I highly recommend a steel yarn needle. It makes it really easy to sew on pieces when the giraffe is stuffed.
Notions
- 16 mm Eyes – While this pattern was made using safety eyes, you can certainly swap them out for felt eyes or embroidered eyes instead!
- Stuffing – This project will require a good amount of stuffing. You’ll need a larger bag of stuffing to be able to fully stuff this design.
What Size is the Belly Friend Giraffe?
The finished Belly Friend Giraffe made with worsted weight (4) yarn will be approximately 10-12 inches tall. If you opt to use a thicker yarn like Bernat Blanket yarn, the finished size will significantly increase to approximately 21 inches tall.
Abbreviations (US Terms)
- Ch – Chain
- Sl St – Slip Stitch
- SC – Single Crochet
- INC – Increase
- DEC – Decrease
- FO – Finish Off
Special Stitches
Magic Circle: This pattern starts with a magic circle. Here is a video tutorial by MJ Carlos on how to make a magic circle and crochet single crochets into the the circle (or ring).
Invisible Decrease: I use invisible decreases when reducing stitches in the round. Here is a video tutorial by A Menagerie of Stitches on how to crochet invisible decreases.
Tips Before You Begin
If you are planning to make these for markets or to make multiples of them at once, you can make all of the arms, horns, ears, and noses at once. The arms need to be made before the body if you are planning on using the no-sew option for the arms.
It may be helpful to keep a notepad nearby to keep track of your rounds and to use a stitch marker to keep track of stitches as you go.
I ask that you please do not copy, sell, republish, or redistribute this pattern. You may sell items produced using this pattern (in fact, I hope you do!), however, please do not use my photos for your product listing.
Belly Friend Giraffe Crochet Pattern
Arms – Make Two
Main color
Round 1: 6 SC into magic circle (6)
Round 2: INC x 6 (12)
Rounds 3-14: 12 SC around (12) – 12 rounds
Stuff the tips of the arms lightly. Fold in half and SC closed with 6 SC. Finish off and leave a long yarn tail for sewing later or a short tail for the no-sew option.

Ossicones (Horns) – Make Two
Starting in accent color
Round 1: 4 SC in magic circle (4)
Round 2: INC x 4 (8)
Round 3: [SC, INC] x 4 (12)
Round 4: 12 SC around (12)
Round 5: [SC, DEC] x 4 (8)
Stuff the top part of the horn.
Change to main color.
Rounds 6-11: 8 SC around (8) – 6 rounds
Stuff the horn. Finish off and leave a long yarn tail for sewing later.

Ears – Make Two
Main color
Round 1: 6 SC in magic circle (6)
Round 2: INC x 6 (12)
Round 3: [1 SC, INC] x 6 (18)
Round 4: [2 SC, INC] x 6 (24)
Fold the ear in half and SC 4 through both sides of the stitches. Finish off and leave a long yarn tail for sewing later.


Nose
Accent color
Chain 6.
Round 1: In the 2nd CH from the hook, place 1 SC, then 3 more SC down the CH. In the last CH, you will INC. On the opposite side of the CH: 4 SC, INC (12)
Round 2: INC, 3 SC, INC x 3, 3 SC, INC x 2 (18)
Round 3: INC, 6 SC, INC x 3, 6 SC, INC x 2 (24)
Round 4: 24 SC around (24)
Finish off and leave long yarn tail for sewing later.

Spots – Make One of Each Size
Accent color
Small
Round 1: 6 SC in magic circle (6)
Round 2: INC x 6 (12)
Finish off and leave long yarn tail for sewing later.
Medium
Round 1: 7 SC in magic circle (7)
Round 2: INC x 7 (14)
Round 3: [1 SC, INC] x 7 (21)
Finish off and leave long yarn tail for sewing later.
Large
Round 1: 8 SC in magic circle (8)
Round 2: INC x 8 (16)
Round 3: [1 SC, INC] x 8 (24)
Round 4: [2 SC, INC] X 8 (32)
Finish off and leave long yarn tail for sewing later.

Legs – Make Two
Fasten off the first leg, but not the second leg.
Main color
Round 1: 6 SC in magic circle (6)
Round 2: INC x 6 (12)
Round 3: INC x 12 (24)
Rounds 4-7: 24 SC around (24) – 4 rounds
Starting the Body
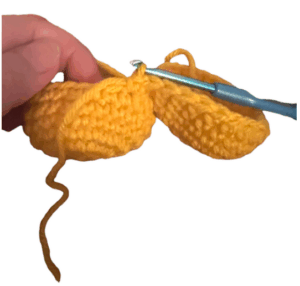
Connect the first leg with a single crochet (see photos below). This single crochet counts as the first stitch of the next round.

Round 1: [7 SC, INC] x 6 (54)
Round 2: 25 SC, INC x 4, 25 SC (58)
Start stuffing the legs
Round 3: 28 SC, INC x 2, 28 SC (60)
Rounds 4 – 6: 60 SC around (60) – 3 rounds
Round 7: [8 SC, DEC] x 6 (54)
Rounds 8 – 9: 54 SC around (54) – 2 rounds
Stuff and shape the belly
Round 10: [7 SC, DEC] x 6 (48)
Round 11: 48 SC around (48)
Continue to stuff and shape the belly
Round 12: [6 SC, DEC] x 6 (42)
Rounds 13 – 16: 42 SC around (42) – 4 rounds
Make sure to keep stuffing and shaping the belly. The belly should start to look like the pictures below.


Body Continued
Round 17: [5 SC, DEC] x 6 (36)
Round 18: 36 SC around (36)
Round 19: [4 SC, DEC] x 6 (30)
Round 20: [3 SC, DEC] x 6 (24)
Round 21: 24 SC around (24)
Round 22: [2 SC, DEC] x 6 (18)
Note: If you would like to use the no-sew option for the arms, you will attach the arms next and they are attached over 2 rounds – rounds 23-24. If you would prefer to sew the arms in place, you can just SC without the arms.
Round 23: 6 SC, attach arm with 6 SC, 3 SC, attach 2nd arm with 3 SC (18)
Note: Arm placement may have to be adjusted depending on how your work spirals.
Round 24: Attach the rest of the arm with 3 SC, 15 SC (18)
Rounds 25 – 28: 18 SC around (18) – 4 rounds
Stuff the neck really well, but not to where stuffing is showing through. You can insert a dowel for extra support if needed (but be careful if giving to small children!)
Starting the Head
Round 29: INC x 18 (36)
Round 30: [5 SC, INC] x 6 (42)
Round 31: [6 SC, INC] x 6 (48)
Rounds 32 – 38: 48 SC around (48) – 7 rounds
If using safety eyes, insert eyes between rounds 35 and 36 so they are 6 visible stitches apart. Make sure they’re centered.
Stuff the neck some more to make sure it is really sturdy without having stuffing come through stitches.

Head Continued
Round 39: [6 SC, DEC] x 6 (42)
Round 40: [5 SC, DEC] x 6 (36)
Start stuffing and shaping the head. Make sure you’re stuffing and shaping it evenly.
Round 41: [4 SC, DEC] x 6 (30)
Round 42: [3 SC, DEC] x 6 (24)
Keep stuffing and shaping as you go.
Round 43: [2 SC, DEC] x 6 (18)
Round 44: [1 SC, DEC] x 6 (12)
Round 45: DEC x 6 (6)
Finish off and close the circle.

Assembly Instructions
Felt/Embroidered Eyes: If you are using felt eyes or embroidered eyes, add them before adding the nose. They should be about 10 rows down the from the top of the head and centered on the head with about 6 visible stitches between them.
Nose: Sew the nose on between the eyes. The nose should cover 5-6 rounds. Stuff the nose as you’re sewing it on.


Horns: Horns should be sewn on 2 rounds from the magic circle. They should cover about 3-4 rounds.
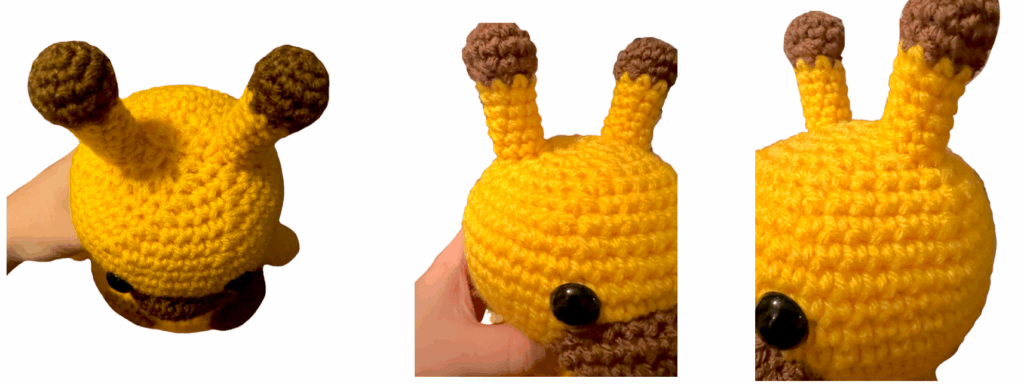
Ears: Ears are sewn 1 round down from the horn on each side. Use the horns as a guide for placement.
Arms (Sewing Option): If sewing on your arms, sew them onto round 24 of the body.
Spots: Sew the spots on wherever you see fit. You can look at the picture below to see how the designer placed them if you need inspiration.
Eyebrows and Nostrils: Add eyebrows and nostril details as shown in the finished picture.
Tail: To add a tail, cut off a few strands of your main color yarn and attach them through the back of the giraffe. Braid the tail and tie a knot at the end of the braid to secure it. Cut off a few pieces of your accent color and tie them to the ending of the tail. Trim the yarn tails to your desired length.
Congratulations! You’re finished!
How to Customize
You can easily customized your Belly Friend Giraffe by changing up the colors, spot placement, or yarn you use. In addition, you can add extra embellishments like hats, bows, or flowers headbands to include a dash of pizazz!
Selling & Market Tips
The Belly Friend Giraffe works really well for:
- Craft Fairs with Lots of Kids
- Events with Animals or Petting Zoos
- Online Sales Aimed at Animal Lovers and Kids
- Custom Birthday Gifts for Giraffe Lovers
Suggested Pricing Range:
$40 – $100 depending on materials and region
Display Tips:
- Create a safari-themed section of your display by pairing the Belly Friend Giraffe with some other fun safari animals like lions, zebras, or elephants.
- Make some small and large Belly Friend Giraffes using different weights of yarn, or the Mini Belly Friend Giraffe pattern and display the whole herd of giraffes together!
- Use shelves or crates to add height to your display and make sure your giraffes are at eye-level! This is the best place to put them to draw attention.
- If you make an extra large Belly Friend Giraffe using blanket yarn, be sure to showcase him up high to draw in customers!
Frequently Asked Questions?
Can beginners make this pattern?
If you are brand new to crocheting, this pattern may be a bit too challenging. This pattern is geared towards advanced beginners and intermediate crocheters.
How long does it take to complete?
The time it takes to complete your Belly Friend Giraffe varies by how quickly you crochet. If you are fast crocheter, you could conceivably finish the pattern as written in about 3-4 hours. If you are using a bulkier yarn, the time will likely increase because it slows down your speed. When I made this pattern using Super Bulky yarn, it took me about 8 hours from start to finish to crochet all the pieces and do the sewing and embellishments.
Can I sell items made from this pattern?
Of course! You may certainly sell your finished Belly Friend Giraffe, and I hope you do! I would appreciate if you could give credit to the designer, Madeline Spence of Madeline Mae Co., and my blog, T&C Crafters, when sharing your designs online.
Please note: Selling of this written pattern, or any parts of this pattern are strictly prohibited!
What yarn works best?
Be sure to check out the suggested yarns listed in the materials section of this post! I recommend Red Heart Super Saver, Big Twist Value, Lion Brand Pound of Love, Ella Rae Cuddle, Premier Parfait Chunky, and Bernat Blanket yarn.
How do I wash this item?
I highly recommend spot cleaning with a mild soap to wash the Belly Friend Giraffe.
For a full washing, hand-washing with a mild soap is recommended. Please ensure that the yarn you chose is color-fast so the yarn colors don’t bleed when washed.
If you have carefully constructed your project, you can consider machine washing based on the care instructions of the yarn you used. Machine washing may cause the stuffing to move around and the giraffe to lose its shape. If you used safety eyes or felt eyes, be careful that they did not come loose in the washer.
Make sure that the entire piece is completely dried! You do not want the stuffing to remain wet, potentially causing an issue with its safety.
Want the Printable PDF?
The printable PDF is Coming Soon! Please come back to check for updates!
Looking for More Free Crochet Patterns?

Quick & Easy
Frosty Fun Freeze Pop Sleeves

Our Most Popular
Crocheted Car Coasters

Beginner-friendly
Criss-Cross Tote Bag
Thanks for reading!
I hope you love this pattern! Be sure to comment below or tag me on social media @tandc_crafters if you decide to make one for yourself!
Be sure to follow along as I add new free patterns and tutorials to help you make the best of crochet markets!