
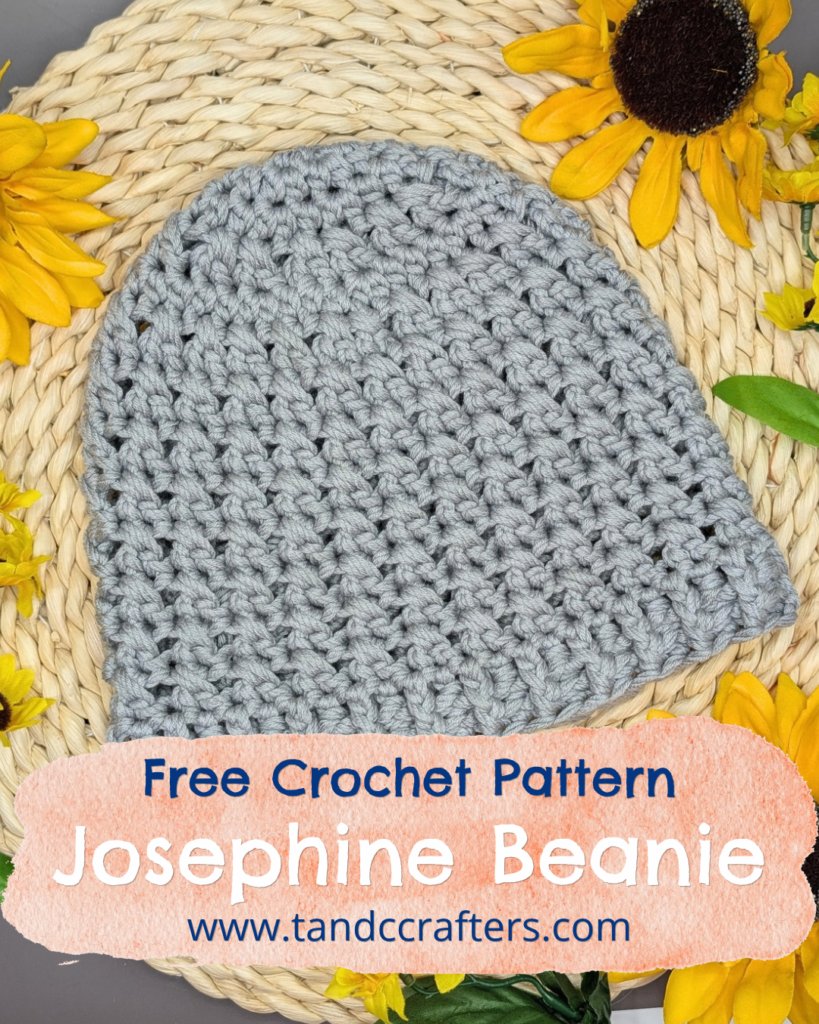
Josephine Beanie – Free Crochet Pattern
Looking for a lightweight beanie for winter that can double as a soft and comfortable chemo hat? The Josephine Beanie is a free, beginner-friendly crochet pattern for a chemo-friendly beanie designed by Candace of T&C Crafters.
Some of the links in this post are affiliate links for Wal-Mart, Amazon, and Etsy. If you go through them to make a purchase, I will earn a small commission at no cost to you. Thank you for your support!
Scroll Down to Get the Printable PDF
Pattern at a Glance:
- Skill Level: Advanced Beginner
- Yarn Weight: Super Bulky (Weight 6)
- Hook Size: L11/8.0 mm
- Construction Type: Worked in the round
- Time to Make: 2-3 Hours
- Finished Size: Medium Adult (Head circumference 19 – 20 inches) – Approximately 9.5 inches in diameter at the base and 8 inches long
- Great For: Chemo patients, fall weather, Christmas gifts
Why Should You Crochet a Josephine Beanie?
If you are looking for a texture, comfy beanie for this winter, the Josephine Beanie is the perfect choice! Made with a soft, Bamboo and Cotton blend, it is silky, soft, and breathable, with a lovely texture made using double crochet cross stitches.
Even with some more involved stitches, this pattern is still easy to follow and works up in just a few hours! It can be made as intended as a breathable chemo cap or made with different types of chunky yarn to be a warmer winter beanie.
The Josephine Beanie was designed in memory of my father-in-law and named after his mother’s middle name. After beating cancer once earlier in his life, he unfortunately passed away due to a sudden battle with brain cancer a few years ago. In his memory, I will be making beanies using this pattern to donate as part of the Crochet Cancer Challenge, and I hope you will join me in doing so as well!
The Crochet Cancer Challenge
The Crochet Cancer Challenge is an annual event hosted by Christine from Sweet Potato 3. During this event, different talented crochet designers work together and share their crochet hat patterns. For a limited time, you can download a PDF copy of each of the patterns for free using the information provided for that day.
When you download a free PDF from the Crochet Cancer Challenge, you are pledging to make at least one hat from that pattern to donate to someone affected by cancer. It’s up to you how you want to donate your crocheted hat – to a local cancer treatment center, a hospital, a charity, or another organization. We just ask that you follow through with your pledge!
By working together, your download of a free pattern makes a huge impact! Each hat can provide a little comfort and warmth to someone going through an incredibly challenging time in their life.
I hope you join in the challenge to help those battling cancer. I am going to be donating the hats I designed for this pattern to a local hospital that cared for my father-in-law when he battled brain cancer.
If you decide to share your finished projects on social media, please use #CrochetCancerChallenge and tag @tandc_crafters and @sweetpotato3patterns so we can see what you made!
What Supplies Do You Need to Crochet a Josephine Beanie?
Yarn: Approximately 150 g of Jubilee Yarn Minnesota’s Bamboo Cotton Chunky in Smoky Sky or another comparable Super Bulky (Weight 6 yarn)
Hook: L11/8.0 mm Crochet Hook
Tools: Scissors, Yarn Needle, Stitch Markers
Recommended Yarn
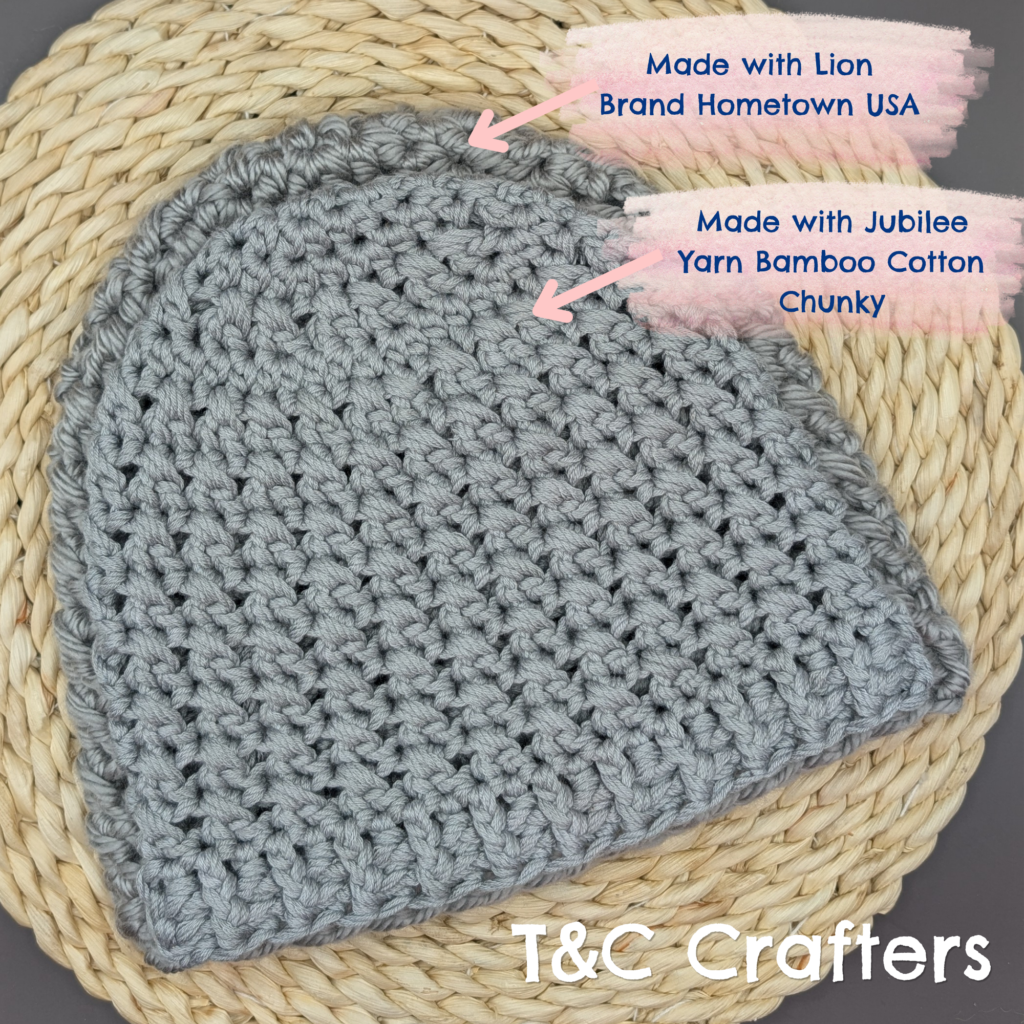
This pattern is made using super chunky (weight 6) yarn. If you are making this beanie for a chemo patient, it is important to use a soft yarn that won’t scratch or irritate their skin. I recommend Jubilee Yarn Minnesota’s Bamboo Cotton Chunky. It is a 50% cotton and 50% bamboo mix that is soft and works up nicely. It is available in 31 colors!
I used the colorway Smoky Sky, but I have also tried out Sea Grey, which is a beautiful bluish dark gray.
If you are using this beanie for everyday wear or want a warmer version, I recommend trying out Lion Brand Hometown USA yarn. This super chunky yarn works up nicely and is very warm. I made a version of this beanie in the colorway Dallas Gray and it came out slightly larger than the original measurements, so you will want to adjust your tension accordingly. However, if you want a larger hat, this might be a great way to make the hat larger!
Alternative Yarn Options
Some other great super bulky (weight 6) yarns that would work great for this beanie are:
- Premier Basix Chunky – 100% Acrylic
- Loops and Thread Charisma – 100% Acrylic
- Lion Brand Wool-Ease Thick and Quick – 80% Acrylic, 20% Wool
- Juniper Moon Big Merino Wool Yarn – 100% organic Merino Wool
Tools
Gauge (Essential)
Using a L11/8.0 mm crochet hook and super bulky (weight 6) yarn, a magic ring with 8 HDC should measure 1.25 inches in diameter.
What Size is a Josephine Beanie?
The original pattern shared in this post is meant for a medium adult head with a circumference of about 19-20 inches. It measures 9.5 inches wide at the base of the hat and 8 inches long.
If you need this hat in a different size, you can adjust the size of the beanie by adding or subtracting rounds before continuing lengthwise. Check out the customization section for more information on adjusting the size!
Abbreviations (US Terms)
- Ch – Chain
- Sl St – Slip Stitch
- HDC – Half Double Crochet
- HDC INC – Half Double Crochet Increase
- FPHDC – Front Post Half Double Crochet
- BPHDC – Back Post Half Double Crochet
- FO – Finish Off
Special Stitches
Double Crochet Cross Stitch – To complete a cross stitch, you need to skip the first stitch, double crochet in the second stitch, and then double crochet in the stitch that you had previously skipped.
Here is a great video tutorial by Hooked by Robin that explains how to complete a cross stitch.
Front Post Half Double Crochet – Yarn over. Insert the hook between the posts of the stitches from the previous round. Move your hook to the left behind the post of the stitch and back out through the front (between the next two posts). Yarn over and pull up the loop. You should now have 3 loops on your hook. Yarn over one more time and pull through all 3 loops on your hook to finish the stitch.
Back Post Half Double Crochet – Yarn over. Insert the hook from behind between the posts of the stitches from the previous round. Move your hook to the left in front of the post of the stitch and back out through the back (between the next two posts). Yarn over and pull up the loop. You should now have 3 loops on your hook. Yarn over one more time and pull through all 3 loops on your hook to finish the stitch.
Tips Before You Begin
This pattern is worked in continuous rounds, so you will not be joining and chaining between each round. Because of this method, it may be especially helpful to use a stitch marker to help you keep track of your place in the pattern.
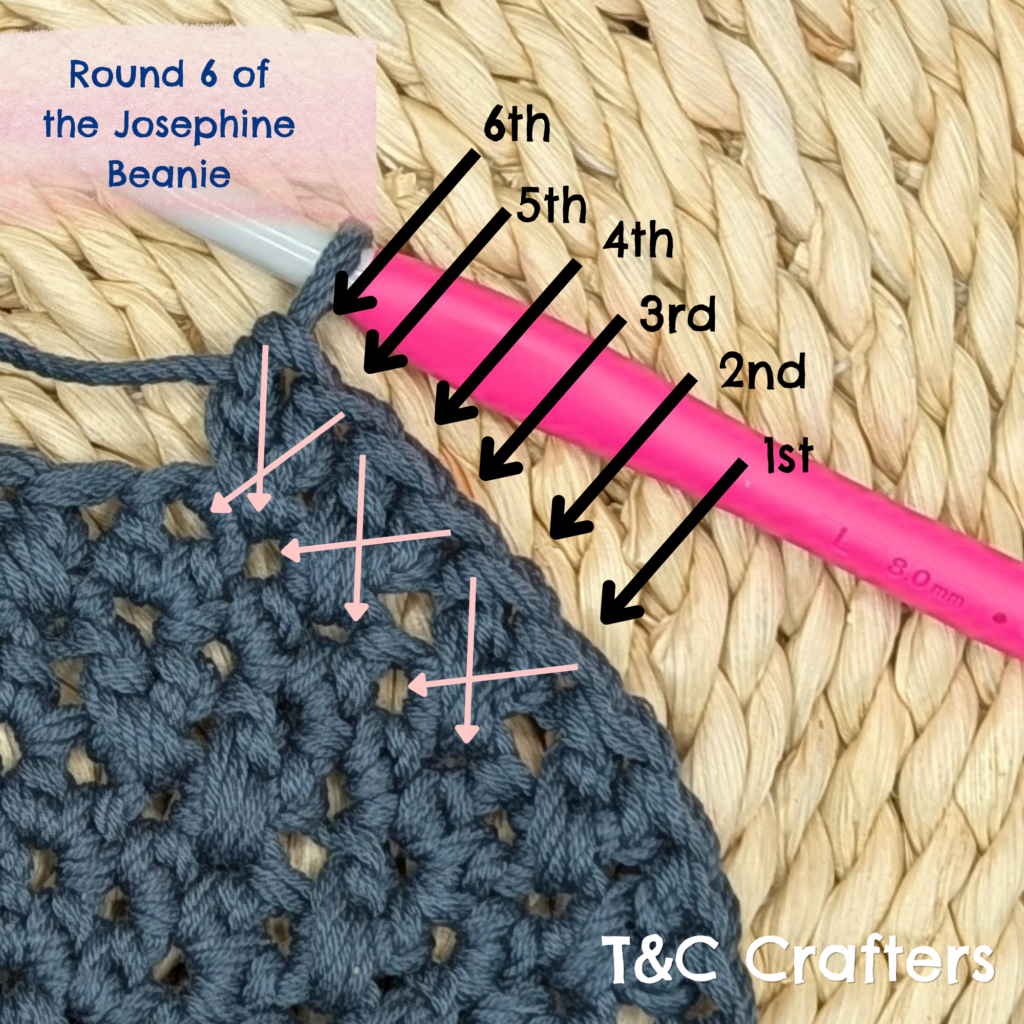
Be cautious when completing the rounds with double crochet cross stitches and double crochet cross stitch increases. It is really easy to accidentally place a stitch in the wrong spot. A stitch marker is especially helpful for this rounds to make sure you didn’t make a mistake!
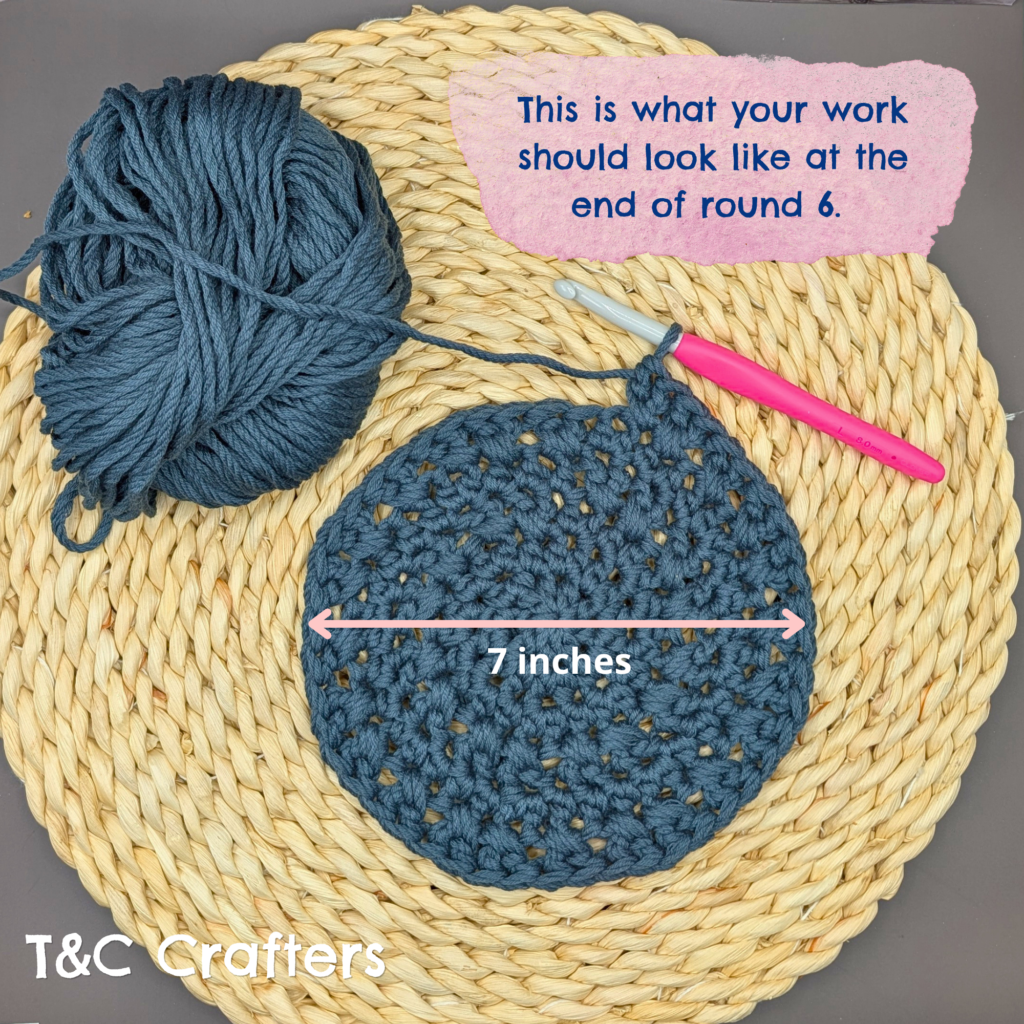
Here’s a picture of round 6 of the pattern so you can see how the stitches should be placed on that type of row:
I ask that you please do not copy, sell, republish, or redistribute this pattern. You may sell items produced using this pattern (in fact, I hope you do!), however, please do not use my photos for your product listing.
Josephine Beanie Crochet Pattern
Round 1: Create a magic ring, ch 2, HDC 8 in ring. Pull yarn to close (8)
Round 2: HDC INC x 8 (16)
Round 3: [HDC, HDC INC] x 8 (24)
In the next round, you will be crocheting a double crochet cross stitch. To do this, you will skip the next stitch and place a double crochet in the following stitch. Then, you will go back to the stitch you skipped and place a double crochet in that skipped stitch. This will make the stitches cross over one another like an “x”.
For the double crochet cross stitch increase, you will not skip a stitch. Instead, double crochet in the next stitch and go back to the previous stitch (that already has a stitch in it) and place another double crochet.
Round 4: [Double Crochet Cross Stitch, Double Crochet Cross Stitch Increase] x 8 (32)
Round 5: [3 HDC, HDC INC] x 8 (40)
Round 6: [2 Double Crochet Cross Stitch, Double Crochet Cross Stitch Increase] x 8 (48)
At this point, you have finished the crown of the hat. It should measure just over 7 inches in diameter. If you need a different size of hat, you can remove or add rounds to make the crown size appropriate for the hat size you want.
Rounds 7 -13: Double Crochet Cross Stitch Around (48)
Round 14: HDC around (48)
Rounds 15 – 16: [FPHDC, BPHDC] x 24 (48)
Finish off and weave in ends.
Want to print this pattern out to save for later? Scroll down to find the printable PDF!
How to Customize the Josephine Beanie
I’d love for you to make this beanie perfect for you or a loved one! Here are some tips on how to customize it!
Sizing
Larger – To make a larger hat, you will want to add an additional round of increases between rows 6 and 7. I would recommend doing [5 HDC, HDC INC] x 8 for a total of 56 stitches, and then continue with rounds 7 and on as written with 56 stitches in each round.
Smaller – To make a smaller hat, you will want to remove round 6. After round 5, continue to round 7 and finish the pattern with only 40 stitches in each round.
Length – You can increase or decrease the length of the hat by adding or removing rounds of double crochet cross stitches (rounds 7-13).
Colors
While this beanie was originally made in solid colors, you can certainly add stripes to the pattern or use a variegated yarn. Play around to find what you love best!
Embellishments
You can choose to leave the Josephine Beanie as is and focus on the beautiful texture, or you can add a lovely embellishment to upgrade it even more and make it uniquely yours! A flower would make a great addition to the bottom corner of the hat!
Frequently Asked Questions?
Can beginners make this pattern?
There are some more advanced stitches in this pattern, but if you use the video tutorials to learn how to complete them, this pattern can certainly be beginner-friendly! I don’t recommend it as a first beanie project, but it is certainly attainable for an advanced beginner.
How long does it take to complete?
It takes about two hours to crochet a Josephine Beanie
Can I sell items made from this pattern?
Absolutely, and I’d be happy to hear that you do! I just ask that you do not sell the pattern and give credit to me as the designer when showing off your work 🙂
What yarn works best?
This pattern is meant for super bulky (weight 6) yarn, specifically Jubilee Yarn Bamboo Cotton Chunky. You can also make this pattern with other super bulky yarns, but the size may vary slightly.
How do I wash this item?
You will want to look at the label of the yarn you choose to determine how to wash and dry a beanie made with that specific yarn. For most yarns, you will want to hand wash and lay flat to dry.
Want the Printable PDF?
If you prefer an ad-free version of this pattern, grab the printable PDF below.
Looking for More Patterns?
Here are some other great hat patterns you can find right here on the blog!

Criss-Cross Chunky Beanie – Free Crochet Pattern

Criss-Cross Bucket Hat – Free Crochet Pattern
Thanks for reading!
I hope you love this pattern! Be sure to comment below or tag me on social media @tandc_crafters if you decide to make one for yourself!
Be sure to follow along as I add new free patterns and tutorials to help you make the best of crochet markets!